Searchspring
Recommended Reading
- Searchspring
- Vue
Installation
Feed
We will use a Miva Marketing Feed to create an XML file on the Miva server full of the product-catalog data so that SearchSpring can index the static XML file.
1. Create Miva Template Feed
In the Miva Admin, go to "Marketing > Feeds > Add Feed", and configure it based on the following details:
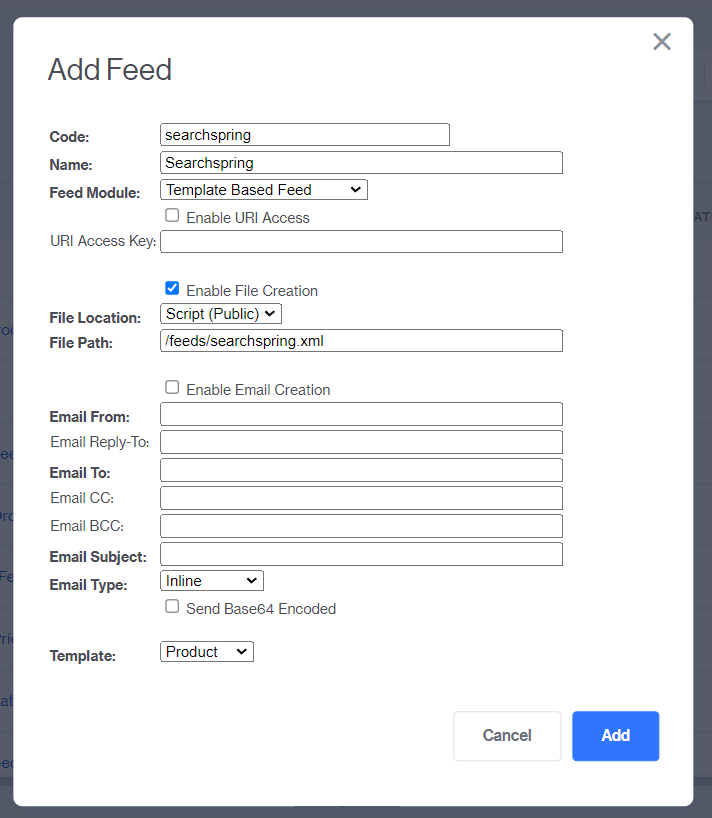
- Code:
searchspring - Name: "Searchspring"
- Feed Module: "Template Based Feed"
- Enable File Creation: Yes
- File Location: "Script (Public)"
- File Path:
/feeds/searchspring.xml(be sure to create thehttpdocs/feeds/directory) - Template: "Product"
See docs.miva.com/reference-guide/feeds for more details about Marketing Feeds in general
Edit the template of the searchspring feed (i.e. navigate to "User Interface > Templates > TEMPLATEFEED_searchspring")
Click the "Advanced Mode" link and then set the feed settings to the following values:
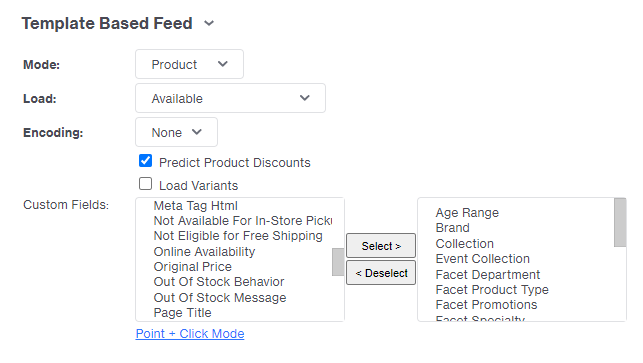
- Mode: "Product"
- Load: "Available"
- Predict Product Discounts: Yes
- Custom Fields: Select any of them you want to display or sort by (ex: Brand, Product Type, Rating, etc.)
Replace the "Header Template" with the contents of optional-extensions/searchspring/miva-templates/templates/TEMPLATEFEED_header-templatefeed_searchspring-templatefeed.mvt
Replace the "Iterator Template" with the contents of optional-extensions/searchspring/miva-templates/templates/TEMPLATEFEED_iterator-templatefeed_searchspring-templatefeed.mvt
Replace the "Footer Template" with the contents of optional-extensions/searchspring/miva-templates/templates/TEMPLATEFEED_footer-templatefeed_searchspring-templatefeed.mvt
2. Create Scheduled Task
Navigate to "Store Settings > Scheduled Tasks" and click the "Create New Scheduled Task" button.
Create a scheduled task with the following settings:
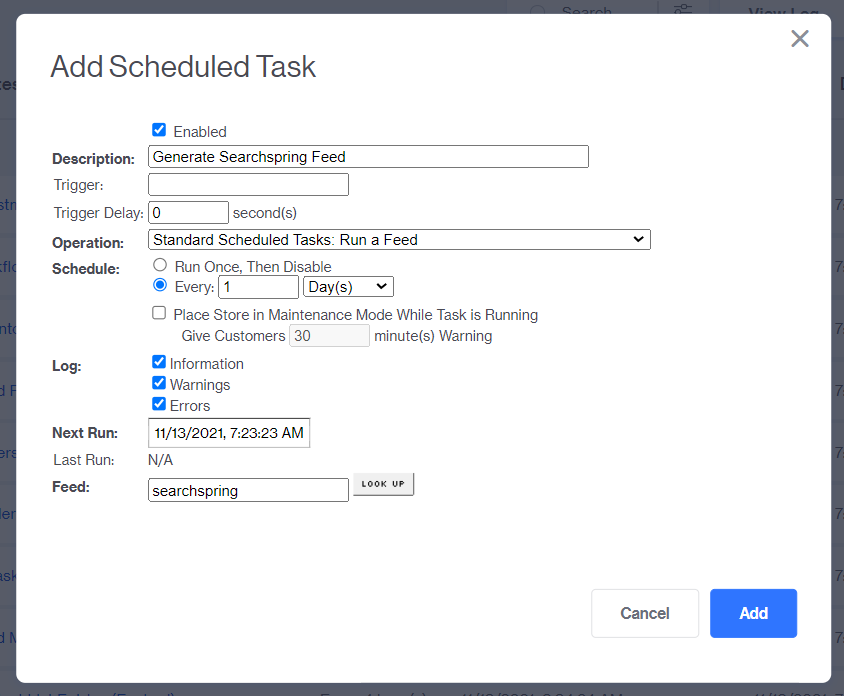
- Enabled: Yes
- Description: "Generate Searchspring Feed"
- Operation: "Standard Scheduled Tasks: Run a Feed"
- Schedule: "Every 1 Day(s)", but you can adjust this to a schedule that works based on the frequency of your site's product-catalog needs
- Log: Information: Yes
- Log: Warnings: Yes
- Log: Errors: Yes
- Feed:
searchspring
3. Generate feed
Navigate to "Store Settings > Scheduled Tasks", select the "Generate Searchspring Feed" row, and click the "Run Scheduled Task(s)" button. (This method is recommended over going to "Marketing > Feeds" and clicking the "Process Now" button because you can check the logs to see when the feed started, ended, or errored out.)
4. Configure Searchspring admin
In the SearchSpring admin, navigate to "Data > Data Feed" and configure the feed with the following settings:
- Select Your Platform: "XML" (Click here to see Searchspring's sample XML file & tips)
- Data Feed Location: "https://genesis.mivamerchantdev.com/feeds/searchspring.xml" (just update the path with your site's domain)
- Data Feed Format: "UTF-8"
- Record Element:
Product - Unique Key:
code - Automatic Updates: Configure as needed for your store
Click the "Check for New Fields" and wait for the process to complete
In Searchspring, Navigate to the "Data > Data Settings > Core Mappings" page and map the Core Fields as follows:
(Note: Click here for more information on SearchSpring's Core Mappings)
- Unique ID:
id - SKU:
sku - Product Name:
name - Product URL:
product_url - Price:
price - Image URL:
image_url - Product Thumbnail Image URL:
thumbnail_image_url - Product Description:
descrip
Updating the Unique Identifier
The Unique ID is currently mapped to use the product id from the data feed. This is used to fetch runtime product data (inventory and pricing) in a request to our framework's API page (JAPI). If the Unique ID is mapped to anything other than the product id (eg. product code), you will need to update the updateResults function in SearchApp.vue and adjust how the request is made to our API page. Otherwise, the request will not return correct runtime product data. Note that SearchSpring maps the id field to it's own value and does not actually use the product id.
If you have custom fields that map to the other optional core fields (Suggest Retail Value, Customer Rating, Number of Reviews, Stock Message, Brand, Popularity), then please set them now too.
Save your mapping and then click the "request a re-index" link.
In Searchspring, Navigate to the "Data > Data Settings > Field Settings" page and map the Core Fields as follows:
(Note: Click here For more information on SearchSpring's Field Settings)
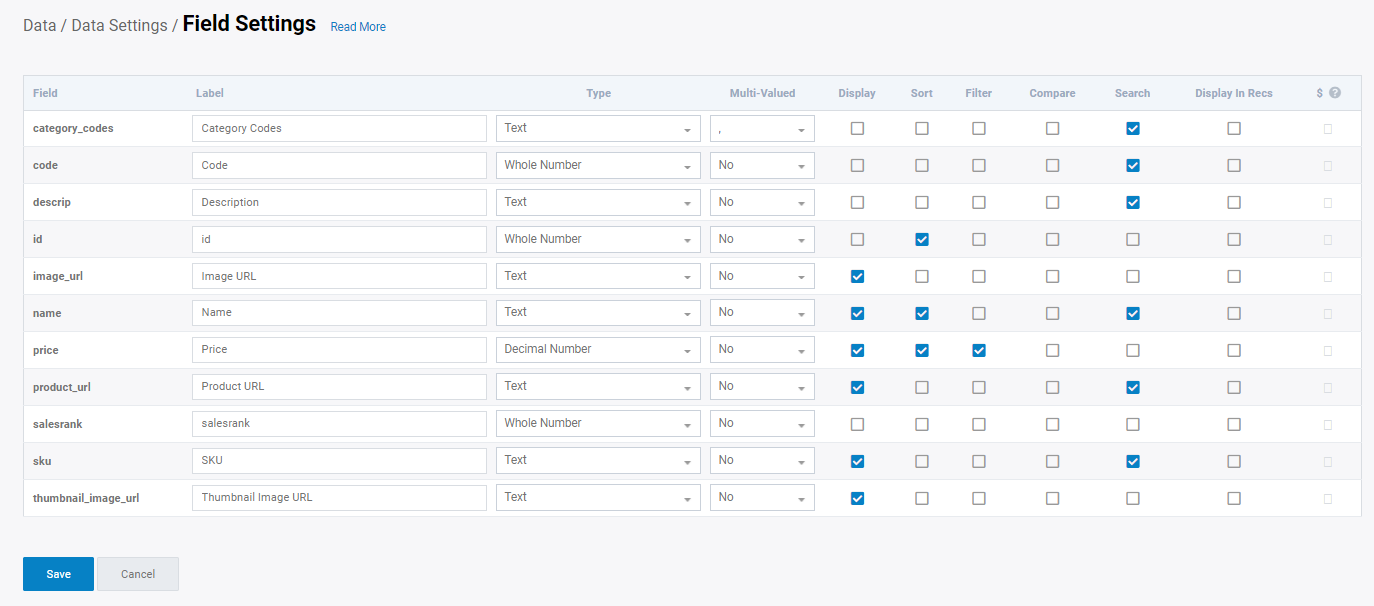
If you have additional custom fields, then please configure them as needed.
In Searchspring, Navigate to the "Site Customizations > Display Settings > Filtering"
(Note: Click here For more information on SearchSpring's Filtering)
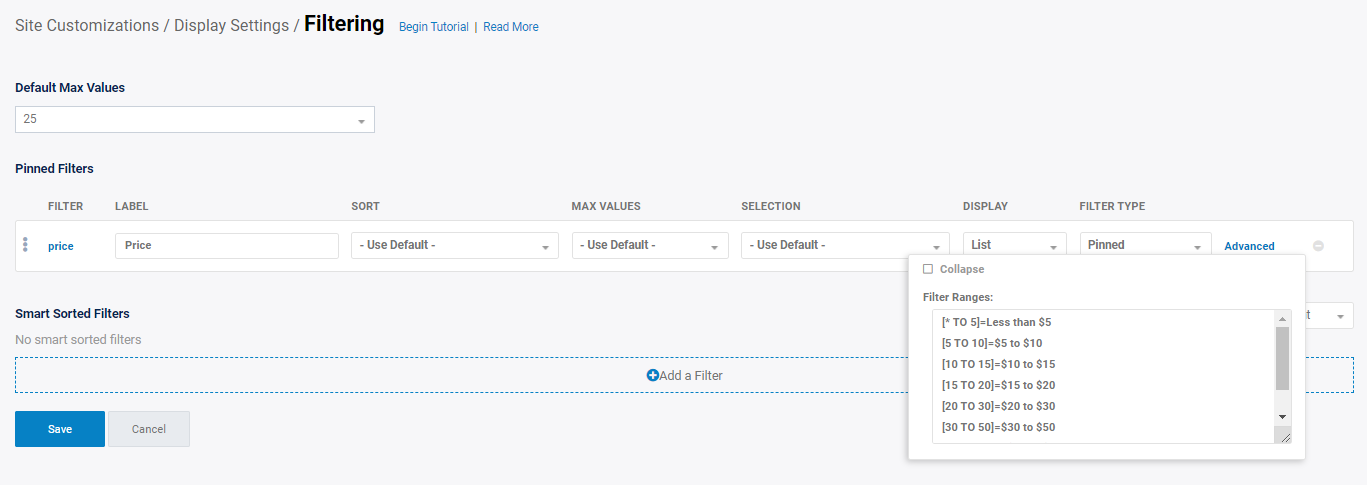
Filtering values is typically highly dependent on the custom fields of your catalog, so this guide only will cover the Price filter.
The main change to the Price filter is under the "Advanced", set the "Filter Ranges" to something like the following (you may need to update it based on the average price-ranges of the store):
[* TO 5]=Less than $5
[5 TO 10]=$5 to $10
[10 TO 15]=$10 to $15
[15 TO 20]=$15 to $20
[20 TO 30]=$20 to $30
[30 TO 50]=$30 to $50
[50 TO 100]=$50 to $100
[100 TO *]=More than $100
In Searchspring, Navigate to the "Site Customizations > Display Settings > Sorting" and configure them based on the following settings
(Note: Click here For more information on SearchSpring's Sorting)

After all of the above items have been configured, you should be all set. Just head over to the "Index Status" page and click the "Update Index" button
Templates
When installing SearchSpring on the store, it's helpful to maintain the existing functionality of Miva's CTGY & SRCH pages in-case the client would like to use them in the future on specific pages or the entire site. To achieve this, we recommend creating two new CTGY_SS & SRCH_SS pages to be dedicated to the Searchspring functionality. Then, when you've completed the installation, you can rename CTGY to CTGY_DEFAULT and SRCH to SRCH_DEFAULT and CTGY_SS to CTGY and SRCH_SS to SRCH. This gives you the option of setting a specific category to have an alternate display page of CTGY_DEFAULT. Additionally, you can always re-add the _SS and remove the _DEFAULT if need be.
1. Create SRCH_SS Page
In the Miva Admin, create a new Page "User Interface > Templates Pages" and click the "Add Page" button.
Create a page with the following settings:
- Code:
SRCH_SS - Name: "Searchspring Search"
- Always Link to This Page Using HTTPS: Yes
- Cache Page: "Cache Only if the Basket is Empty and No Customer is Logged In"
- Template: Populate with the contents of
optional-extensions/searchspring/miva-templates/templates/srch_ss.mvt
Assign the following items to the page (along with any custom/additional ones you might need):
| Code | Module |
|---|---|
affiliatelink |
CSSUI Affiliate Sign-in Link |
breadcrumbs |
CSSUI Smart Breadcrumbs |
buttons |
CSSUI Buttons |
content |
Content |
cssui_links |
CSSUI Links |
customerlink |
CSSUI Customer Sign-in Lin k |
facets |
CSSUI Product List |
ga_jsencode |
Google Analytics |
ga_tracking |
Google Analytics |
global_minibasket |
Mini-Basket |
hdft |
CSSUI Headers & Footers |
head |
CSSUI HEAD Tag Content |
html_profile |
CSSUI HTML Profile |
navbar |
CSSUI Navigation Bar |
prodctgy_meta |
Product/Category META-Tag Settings |
readytheme |
ReadyTheme |
ry_toolbelt |
Tool Belt |
store |
Standard Store Fields |
tgcomponent |
Components & Layouts |
tokenlist |
Token List |
urls |
CSSUI URLs |
Note: Do not assign the searchfield and search_results items to the page as that will in-crease the TTFB of the load time because Miva to load the search-results product-listing data and we're not using that.
Set the "Content" of the page to what is contained in optional-extensions/searchspring/miva-templates/templates/srch_ss-content.mvt
2. Create CTGY_SS Page
In the Miva Admin, create a new Page "User Interface > Templates Pages" and click the "Add Page" button.
Create a page with the following settings:
- Code:
CTGY_SS - Name: "Searchspring Category Display"
- Always Link to This Page Using HTTPS: Yes
- Cache Page: "Cache Only if the Basket is Empty and No Customer is Logged In"
- Template: Populate with the contents of
optional-extensions/searchspring/miva-templates/templates/ctgy_ss.mvt
Assign the following items to the page (along with any custom/additional ones you might need):
| Code | Module |
|---|---|
affiliatelink |
CSSUI Affiliate Sign-in Link |
breadcrumbs |
CSSUI Smart Breadcrumbs |
buttons |
CSSUI Buttons |
category |
Standard Category Fields |
category_title |
CSSUI Category Title |
content |
Content |
cssui_links |
CSSUI Links |
customerlink |
CSSUI Customer Sign-in Link |
facets |
CSSUI Product List |
ga_jsencode |
Google Analytics |
ga_tracking |
Google Analytics |
global_minibasket |
Mini-Basket |
hdft |
CSSUI Headers & Footers |
head |
CSSUI HEAD Tag Content |
html_profile |
CSSUI HTML Profile |
navbar |
CSSUI Navigation Bar |
prodctgy_meta |
Product/Category META-Tag Settings |
prod_ctgy_hdft |
CSSUI Product/Category Header & Footer |
readytheme |
ReadyTheme |
ry_toolbelt |
Tool Belt |
searchfield |
CSSUI Search Field |
sitemap_exclude |
Standard Sitemap Protocol |
store |
Standard Store Fields |
tgcomponent |
Components & Layouts |
tokenlist |
Token List |
urls |
CSSUI URLs |
Set the "Content" of the page to what is contained in optional-extensions/searchspring/miva-templates/templates/ctgy_ss-content.mvt
3. Extending JAPI Page
Integrate the code from miva-templates/templates/JAPI--partial.mvt into the existing JAPI.mvt file in Genesis.
4. Update the settings JavaScript Resource Group
Add the following variable assignments to the miva-templates/js/settings.mvt:
// Add the following variables to the existing settings.mvt template...
(function (mivaJS) {
    // ...Other variables here...
    mivaJS.Image_Placeholder_Product = '&mvtj:image_placeholders:default;';
    mivaJS.Image_Placeholder_Product_Empty = '&mvtj:image_placeholders:default;';
    mivaJS.Search = '&mvtj:global:Search;';
    mivaJS.Search_Tag = '&mvtj:global:Search_Tag;';
    mivaJS.SRCH_SS_Url = '&mvtj:urls:SRCH_SS:auto_sep;';
    mivaJS.SRCH_Url = '&mvtj:urls:SRCH:auto_sep;';
    mivaJS.SS_Site_ID = '&mvtj:global:SS_Site_ID;';
}(window.mivaJS || (window.mivaJS = {})));
5. Update the HTML Profile
Add the following variable assignment to the miva-templates/cssui-html-profile.mvt:
<mvt:comment>
|
| SearchSpring Site ID
|
</mvt:comment>
<mvt:assign name="g.SS_Site_ID_Live" value="'ib1nl3'" />
<mvt:assign name="g.SS_Site_ID_Dev" value="'ib1nl3'" />
<mvt:assign name="g.SS_Site_ID" value="g.SS_Site_ID_Live" />
ib1nl3 is the SearchSpring Site ID of our Miva/Genesis demo store, just replace this with the client's dev & live Site ID's
The identifier for your site. It can be found on the "My Account" page of the Searchspring Management Console.
6. Update Global Header's Search Form
Update the miva-templates/templates/cssui-global-header.mvt file so that the .g-site-header__search-form submits to the SRCH_SS page:
<mvt:if expr="l.settings:page:code EQ 'SRCH_SS' OR l.settings:page:code EQ 'CTGY_SS'">
    <mvt:assign name="l.settings:search_url" value="l.settings:urls:SRCH_SS:rr" />
<mvt:else>
    <mvt:assign name="l.settings:search_url" value="l.settings:urls:SRCH:rr" />
</mvt:if>
<form class="g-site-header__search-form" method="get" action="&mvte:search_url;" itemprop="potentialAction" itemscope itemtype="http://schema.org/SearchAction">
    <!-- Main search form-->

    <!-- Replace Search Preview Element with the SearchSpring Autocomplete -->
    <div id="autocomplete-main"></div>
</form>
Theme Scripts
1. PNPM Install Dependencies
The Searchspring integration currently uses the following dependencies:
"@mvps-genesis/bootstrap": "^1.0.2",
"@mvps-genesis/debounce": "^1.0.0",
"@mvps-genesis/decode-entities": "^1.0.0",
"@mvps-genesis/event-bus": "^2.0.1",
"@mvps-genesis/parameter-validator": "^1.0.1",
"@mvps-genesis/uid": "^1.0.0",
"lodash.clonedeep": "^4.5.0",
"ssapi-wrapper": "^2.1.1",
"vue": "^2.6.14",
"vue-lazyload": "^1.3.3",
"vue-router": "^3.5.3"
See the latest versions in the optional-extensions/searchspring/package.json file.
The dependencies can be installed by running the following commands:
cd themes/genesis
pnpm add ssapi-wrapper vue vue-lazyload vue-router lodash.clonedeep
2. Setup searchspring custom extension
Create a new directory at: themes/genesis/custom-extensions/searchspring/.
Copy the contents of the optional-extensions/searchspring/custom-extension/searchspring/ folder into the themes/genesis/custom-extensions/ folder.
3. Update themes.js
Add the CTGY_SS.js and SRCH_SS.js scripts to the pageCodeImports object:
bootstrap({
    // scripts omitted for brevity ...
    pageCodeImports: {
        // scripts omitted for brevity ...
        CTGY_SS: () => import('pages/CTGY_SS/CTGY_SS.js'),
        // scripts omitted for brevity ...
        SRCH_SS: () => import('pages/SRCH_SS/SRCH_SS.js'),
        // scripts omitted for brevity ...
    },
    // scripts omitted for brevity ...
});
4. Update Global.js
-
Add the scripts necessary to support the Autocomplete functionality.
Add this to the top of
Global.jsnear the otherimportstatements.import {Autocomplete} from 'custom-extensions/searchspring';Then add this in the
class Globalconstructorfunction:export default class Global extends PageManager { constructor (pageContext) { super(pageContext); /** * Initialize Search Autocomplete UI */ Autocomplete.create({ defaultSearchParams: { resultsPerPage: 4 }, searchBarElements: '#js-search-form-input', searchButtonElements: '.js-search-form-toggle', siteId: pageContext.SS_Site_ID }); // scripts omitted for brevity ... } } -
Remove the
initSearchPreviewcall from theclass Global constructorfunction. - Remove the
initFacets()call from the theclass Global constructorfunction.
5. Update Global.scss
- Remove the
extensions/search-preview/indeximport in Global.scss
6. Add pages/CTGY_SS
Create a directory: themes/genesis/src/pages/CTGY_SS/ and then copy the following files into it:
optional-extensions/searchspring/pages/CTGY_SS/CTGY_SS.jsoptional-extensions/searchspring/pages/CTGY_SS/CTGY_SS.scss
7. Add pages/SRCH_SS
Create a directory: themes/genesis/src/pages/SRCH_SS/ and then copy the following files into it:
optional-extensions/searchspring/pages/SRCH_SS/SRCH_SS.jsoptional-extensions/searchspring/pages/SRCH_SS/SRCH_SS.scss
Features
Autocomplete
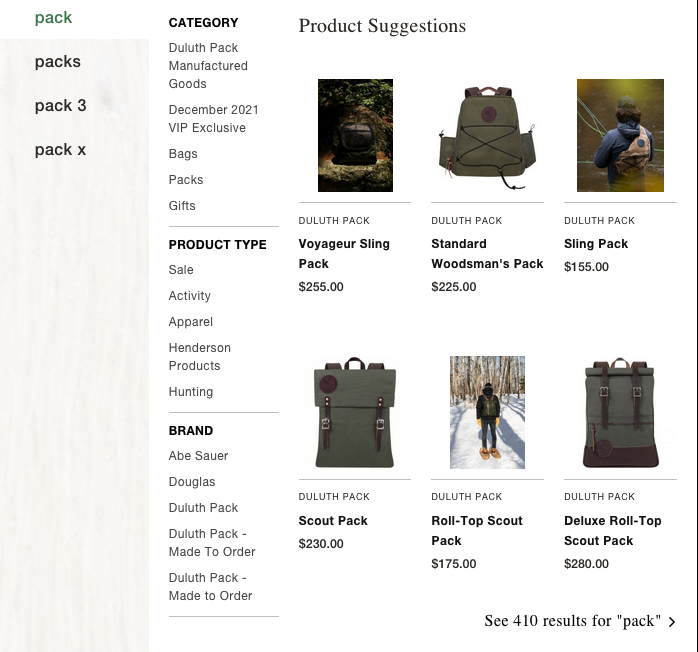
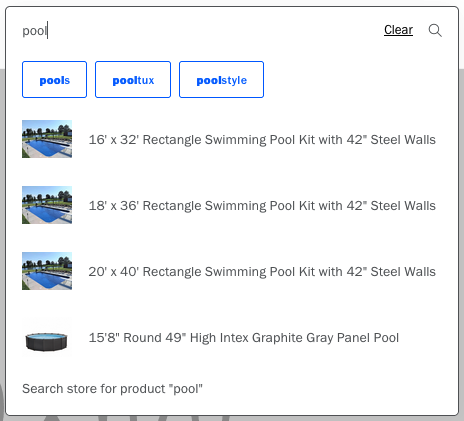
The current Autocomplete or Search Preview returns up to 4 product results and search terms via Autocomplete API integration. The Suggest API returns the search terms in two separate groups 1) the suggested search term and 2) alternative search terms. A subsequent call is made to the Search API to fetch product search results (if available). The current implementation does not support the advanced search results filtering found in SearchSpring's Angular v3 display. See below for a comparison:
SearchSpring Search Preview:
Genesis Search Preview:
Facets
Only the checkbox facet type is supported at this time. We plan to expand support for other facet types in future updates to the integration.
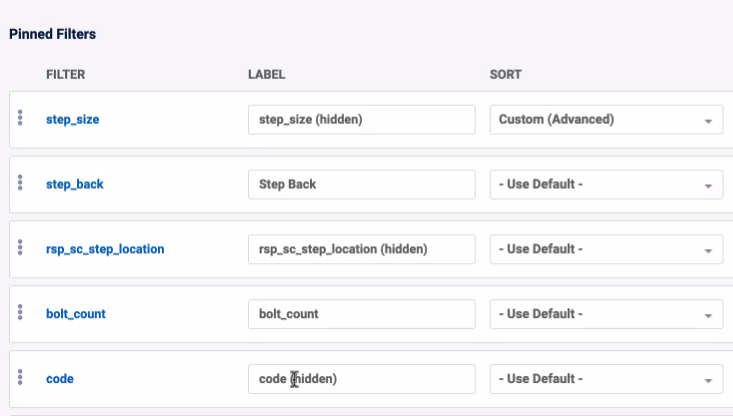
Hiding Facets
You can "hide" facets from displaying on the front-end by having the copy (hidden) in the facet's label property. You can access a facet's settings by going to the Data -> Data Settings -> Field Settings screen in the SearchSpring dashboard. See the screenshot below for example usage:
Merchandising
Banners
The following merchandising banners are supported by default:
- The
headerbanner displays before the product list. - The
footerbanner displays after the product list. - The
leftbanner displays in the facet column below the facets.
We currently do not support merchandising banners inside the product listing section.
Category Header and Footer (Miva)
Currently the integration does not support the display of the category header, promotion banner or footer. This information can be added using the banner feature mentioned above in SearchSpring.
Landing Pages (tags)
You can take advantage of SearchSpring's tag feature by passing the Search_Tag query parameter in the URL to the Search screen.
See Viewing & Linking your Landing Page for more information.